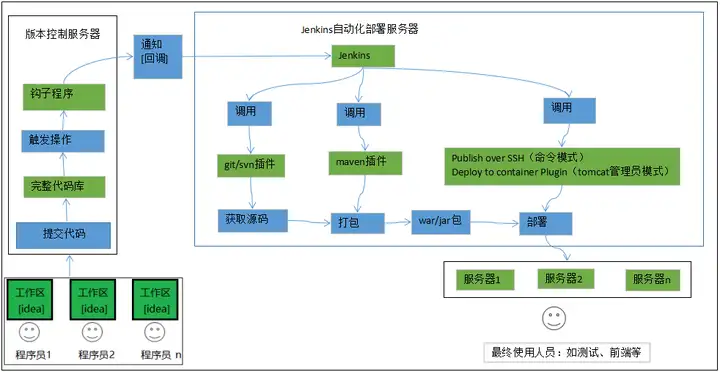
K8S+Jenkins实现SpringBoot项目CI—CD
Jenkins master位于k8s集群外,实现jenkins slave的动态构建、k8s+jenkins中使用自定义maven镜像两篇文章实现了K8S+Jenkins+Maven基础环境,通过此环境我们进一步实现SpringBoot项目的CI/CD。
K8S+Jenkins+Maven基础环境目前能够实现:
- Jenkins slave在K8S集群内的动态构建;
- Maven实现编译、打包、构建镜像并push到远程docker仓库;
剩下的工作需在Jenkins流水线中调用kubectl 命令实现SpringBoot项目在K8S中部署了。
要想Jenkins能够调用kubectl命令,需要安装相关插件,下面我们来介绍下。
Kuberntes相关插件
Jenkins中有两个插件可以实现与Kubernetes进行交互。
一、Kubernetes CLI
此插件允许在Jenkins Job中通过kubectl与k8s集群进行交互,主要是通过kubectl执行各种命令。
1.安装Kubernetes CLI插件
2.通过"Snippet Generator"生成指令
通过"withKubeConfig: Configure Kubernetes CLI"来使用插件:
- Credentials:使用前面文章在devops命令空间中的sa--jenkins
- Kubernetes server endpoint:k8s api server;
- Namespace:需要执行命令的命名空间;
3.添加需要执行的命令
withKubeConfig(caCertificate:, clusterName:, contextName:, credentialsId:k8s-jenkins-slave,namespace:test, serverUrl:https://192.168.3.217:6443) {// 自定义指定块sh"kubectl get pod"}4.执行流水线
pipeline {
  agent {
      labeljenkins-slave-k8s}

  stages {
    stage(check out) {
        steps{
            git credentialsId:c69c70fd-98b8-4efd-9a3a-03e107260, url:https://xx.xx.com/helloworld.git}
    }
    stage(maven打包) {
        steps {
            container(maven) {
                sh"""
                    mvn -version
                """}
      }
    }
    stage(部署) {
        steps {
            withKubeConfig(caCertificate:, clusterName:, contextName:, credentialsId:k8s-jenkins-slave, namespace:test, serverUrl:https://192.168.3.217:6443) {
                // 自定义指令块
                sh"kubectl get pod"}
        }
    }
  }
}
由此可见,通过此插件可以在k8s中执行任何命令。
注意:
- 插件使用的认证server account:jenkins ,绑定的是cluster-admin角色,因此可以不同的namespace中执行命令。
- 如果构建过程中报错:"kubectl: not found",需从宿主机挂载kubectl命令。
二、Kubernetes Continuous Deploy
此插件用于将资源配置文件部署到k8s集群,主要是应用yaml配置文件。
1.安装Kubernetes Continuous Deploy插件
2.添加凭据
"Content"中的内容为"/root/.kube/config"内容,直接拷贝即可。
3.通过"Snippet Generator"生成指令
通过"kubernetesDeploy: Deploy to Kubernetes"来具体使用插件:
- Kubeconfig:使用上面创建的凭据;
- Config Files:"kubectl apply -f" 所使用的yaml配置文件,如helloworld.yaml,具体位置可根据实际情况填写;
- Kubernetes Namespace for secret:harbor仓库密钥所在的命名空间;
- Secret Name:harbor仓库使用的secret;
注意:pod中的容器镜像存在于自建的远程harbor仓库,拉取镜像时需要进行认证,在k8s中我们将此密码在k8s以secret形式存放。
4.添加需要执行的命令
kubernetesDeployconfigs:helloworld.yaml, kubeconfigId:k8s-cd-plugin, secretName:harbor, secretNamespace:test, ssh: [sshCredentialsId:*, sshServer:], textCredentials: [certificateAuthorityData:, clientCertificateData:, clientKeyData:, serverUrl:https://]简化kubernetesDeploy configs:helloworld.yaml, kubeconfigId:k8s-cd-plugin, secretName:harbor, secretNamespace:test通过以上两个插件的简单使用对比,我选择"Kubernetes Continuous Deploy"插件进行部署,毕竟所有的资源都是以yaml来描述的;而"Kubernetes CLI"插件可以用来做一些具体的命令执行。
SpringBoot部署
K8S部署Springboot项目一文我们已经实现了SpringBoot项目在K8S中部署,再结合Jenkins 的Kubernetes Continuous Deploy插件,就可以打通K8S+Jenkins了。
在正式部署前,我们首先思考下以下几个问题:
- 一份yaml文件如何适配测试、生产等多个环境?
- yaml文件与源码一块托管在git中,如何避免运维因修改yaml导致的git冲突?
由于不同的环境依赖不同的hosts、JAVA_OPTS,也就意味着无法使用一份yaml匹配多环境。因此我希望放到git中的yaml最好是一个固定的模板文件,在流水线中通过环境变量的形式适配不同的环境。参考SpringBoot的分环境加载配置文件的功能,我们也将yaml按环境分配,如下:
生产环境helloworld-prod.yaml测试环境helloworld-test.yaml在流水线中只需将JAVA_OPTS、镜像tag传递到模板中即可。
一、yaml配置文件
首先我们需要一份由Deployment、service、ingress组成的yaml文件,用于描述SpringBoot项目。在K8S部署Springboot项目一文中为方便演示,我们将其分别拆分,但在生产中,我们需要将其合并为一个文件,便于统一管理。
注意:由于我们从模板生成最终的yaml,在此我们看模板配置文件。
以测试模板配置文件为例vim helloworld-test.tplapiVersion:apps/v1kind:Deploymentmetadata:name:helloworldnamespace:testspec:replicas:1selector:matchLabels:app:helloworldtemplate:metadata:name:helloworldlabels:app:helloworldspec:hosts解析hostAliases:-ip:"10.11.10.11"hostnames:-"api1.test.cn"-"api2.test.cn"-ip:"10.11.10.12"hostnames:-"api3.test.cn"containers:-name:helloworld环境变量env:-name:JAVA_OPTSvalue:{JAVA_OPTS}镜像tagimage:harbor.test.cn/helloworld/helloworld:{tag}imagePullPolicy:IfNotPresentlivenessProbe:httpGet:path:/port:8080initialDelaySeconds:60timeoutSeconds:5readinessProbe:httpGet:path:/port:8080initialDelaySeconds:60timeoutSeconds:5ports:-containerPort:8080resources:limits:cpu:"0.5"memory:"500Mi"requests:cpu:"0.5"memory:"500Mi"volumeMounts:-name:logdirmountPath:/logs-name:localtimemountPath:/etc/localtime-name:timezonemountPath:/etc/timezoneimagePullSecrets:-name:harborvolumes:-name:logdiremptyDir:{}-name:localtimehostPath:path:/etc/localtime-name:timezonehostPath:path:/etc/timezone---apiVersion:v1kind:Servicemetadata:name:helloworldnamespace:testspec:type:NodePortselector:app:helloworldports:-port:8080targetPort:8080---apiVersion:extensions/v1beta1kind:Ingressmetadata:name:helloworldnamespace:testspec:rules:-host:hello.test.cnhttp:paths:-path:/backend:serviceName:helloworldservicePort:8080模板文件中我们设置了JAVA_OPTS、镜像tag变量,经流水线传递具体参数后,将生成最终的helloworld-test.yaml文件,以便"Kubernetes Continuous Deploy"插件调用。
二、流水线配置
Jenkins新建流水线项目并添加以下流水线:
pipeline {
    agent {
        labeljenkins-slave-k8s}
    environment {
        branch ="test"JAVA_OPTS ="-Xmx128m -Xms128m -Dspring.profiles.active=${branch}"}
    stages {
      stage(check out) {
          steps{
              git branch:test, credentialsId:c69c23sdfd-98b8-4efd-9a3a-03e1073sdf260, url:https://xx.xx.com/helloworld.git}
      }
      stage(maven打包) {
          steps {
              container(maven) {
                  sh"""
                      获取git版本作为镜像tag
                      tag=`git rev-parse HEAD`
                      echo \$tag
                      mvn clean package docker:build -DdockerImageTags=\$tag -Dmaven.test.skip=true -DpushImageTag
                      从模板生成最终yaml文件
                      sed -e "s{tag}\$tagg;s{JAVA_OPTS}${JAVA_OPTS}g" helloworld-test.tpl > helloworld-test.yaml
                  """}
        }
      }
      stage(测试部署) {
          when {
              environment name:branch, value:test}
          steps {
              kubernetesDeploy configs:helloworld-test.yaml, kubeconfigId:k8s-cd-plugin, secretName:harbor, secretNamespace:test}
      }
    }
}
要点:
- 通过environment传递JAVA_OPTS变量;
- 镜像tag无法通过获取环境变量GIT_COMMIT,因此只能通过命令获取;
- 通过when来匹配不同环境的部署,由于不是多分支流水线,因此不能使用when { branch: test},但能通过environment进行匹配判断;
最终部署结果如下:
如图:Jenkins的"Kubernetes Continuous Deploy"插件直接应用的yaml,如果换成"Kubernetes CLI"则需要执行"kubectl apply -f helloword-test.yaml",大家可根据自己的习惯选择不同的插件。
三、回滚
"kubectl apply -f helloword-test.yaml" 是一个滚动升级的过程,即当readinessProbe探针检查正常后才会加入到service的Endpoints提供服务;最终原来的pod将会被终止、删除。
既然滚动升级可以了,我们再来尝试下回滚:
查看deploymentkubectl get deploy -n testNAMEREADY UP-TO-DATE AVAILABLE AGEhelloworld1/1 1 1 4d18h查看版本历史,默认保存10个最近版本。kubectl rollout history deploy helloworld -n testdeployment.apps/helloworldREVISIONCHANGE-CAUSE2总结
为实现整个SpringBoot项目CI/CD的整个过程,因文章篇幅问题,我们从基础环境的准备到本文分别总结了4篇文章,另外3篇为: