为什么AI算法工程师要求C++?
路过,顺便来答一下。一般情况下,我们在训练的时候会使用pytorch、tensorflow或keras(基本算法工程师这几个框架都会用过),我现在用的比较多的是pytorch。在训练完模型后,pytorch的模型文件pth,通常会先通过torch.onnx.export来导出ONNX文件,得到一个静态的模型文件。然后再考虑后续的部署(当然现在torch也支持转torchscript了),移动端部署的话,目前看到用的主要还是C++,还要看你用的具体的推理引擎,有些推理引擎对ONNX文件进行二次转换。比如你准备用MNN来部署,那么ONNX就需要通过MNNConverter进行转换,NCNN则需要通过onnx2ncnn工具转换等等。如果是ONNXRuntime C++的话,可以直接用ONNX文件,而且以我使用的情况看,ONNXRuntime对动态维度输入的支持是比较nice的,对ONNX算子的支持当然是最完善的了。MNN对ONNX的算子兼容性也比较好,基本没遇到ONNX算子转不过来的情况;NCNN支持的算子相对MNN少,但是资料多啊,是鼻祖级别的存在,up主一人扛起一片天。TNN是则新秀选手,对算子的支持也还不错,未来可期;服务端部署则不一定要用到C++,看具体的场景。服务端的推理引擎也不少,比如ONNXRuntime-GPU版本,tensorrt等等,也可以直接用torch的C++库libtorch。
平时我也会梳理一下推理引擎的应用资料,分享出来给大家吧~ 另外,我也顺手捏了一个基于各个推理引擎的C++ AI模型工具箱,目前2k星吧,作为学习资源我还是比较推荐的,也分享一下吧~
模型C++推理案例
目前80多C++推理例子,能编个lib来用,感兴趣的同学可以看看,就不多介绍了
| 开源项目 | 描述 | Github |
|---|---|---|
| Lite.AI.ToolKit | A lite C++ toolkit of awesome AI models.(一个开箱即用的C++ AI模型工具箱,emmm,平时学一些新算法的时候顺手捏的,目前包含100+流行的开源模型。不知不觉接近2k ⭐️ star啦,欢迎大家来点star⭐️ 、提issue呀~) | https://github.com/DefTruth/lite.ai.toolkit |

如果觉得有用不妨给个star支持一下吧~
服务端部署资料


移动端部署资料


模型转换资料

推理引擎编译资料
推理引擎C++工程实践解析
建议可以看看我捏的一个小专栏,有很多详细的讲解哦~(补充说明一下:当然我只是业余在玩,对各个引擎的原理和实现研究的不是很深入,主要是应用,更关注怎么实现业务算法本身的前后逻辑,虽然工作中也用到一些推理引擎,但我主要的工作还是算法研究。所以你如果要研究底层的东西的话,我整理的这点资料是远远不够的,应该去多看看NCNN、MNN这些优秀推理引擎的源码,给主流的推理引擎修修bug,提个PR什么的,可能会比你捏很多应用层的东西更有帮助)

如果你对更多的C++推理应用感兴趣,欢迎点赞、关注和收藏哈~
2022/02/12更新
没想到一天不到就一百赞了,希望这个回答能帮到大家哈~
2022/02/15更新
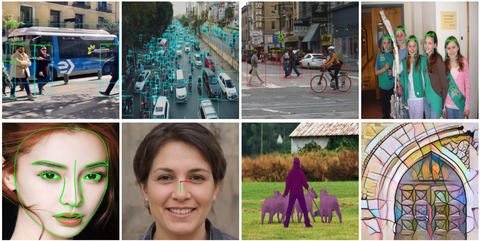
没想到竟然超两百赞了,那我再来更新一波吧。补充一下自己写的另一个开源项目torchlm,这是一个主要做关键点检测的开源项目,因为自己在做相关任务的过程中,并没有找到一个针对该任务的比较简单易用的框架,所以决定自己整理了一个开源项目,torchlm可以通过pip一键安装。torchlm支持100+种与关键点检测相关的数据增强,并且提供训练、评估和推理等完整的high-level APIs,同时提供基于不同推理引擎的c++推理代码,torchlm还一直在更新维护中,目前pypi下载量约6k~,欢迎使用 ~
pip install torchlm>=0.1.6.9  or install the latest pypi version `pip install torchlm`
pip install torchlm>=0.1.6.9 -i https://pypi.org/simple/  or install from specific pypimirrorsuse -i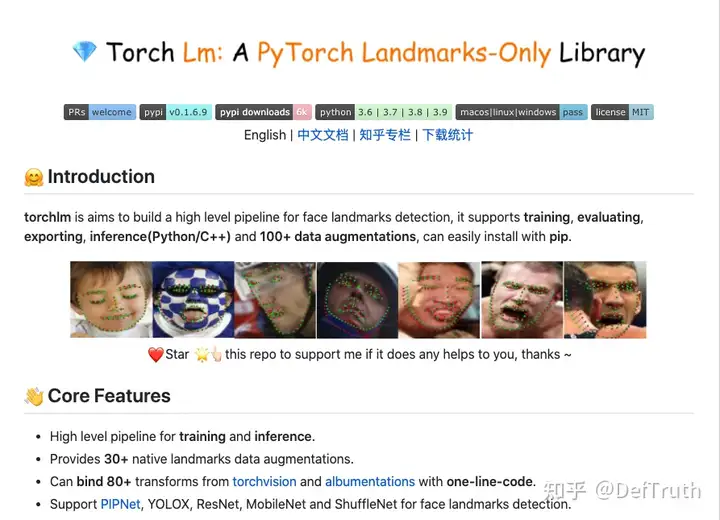
torchlm提供一系列方便实验研究的APIs,包含Pytorch风格的数据增强,方便易用的训练、验证和推理APIs.
比如用torchlm做数据增强:

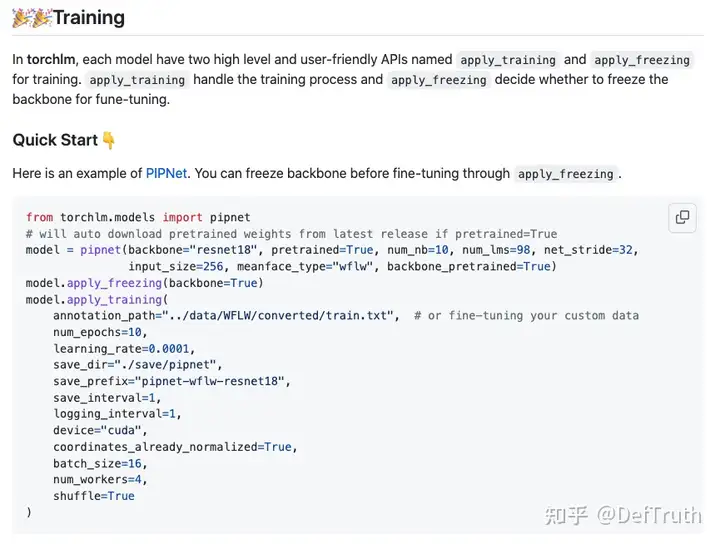
用torchlm做训练或fine-tuning:
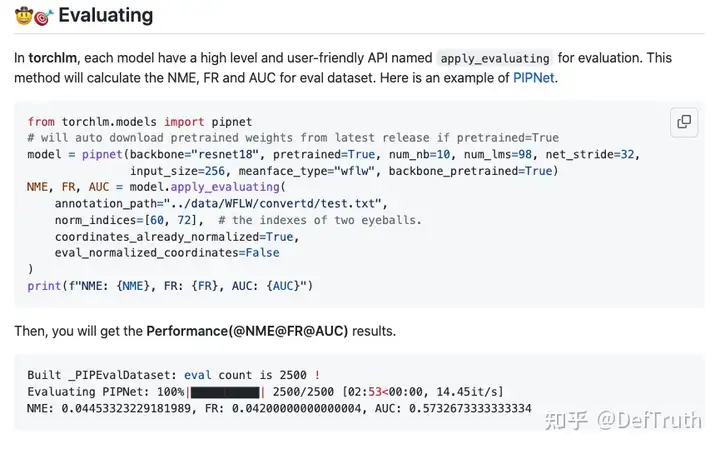
用torchlm做验证(Evaluating),计算NME/FR/AUC:
用torchlm做模型推理:

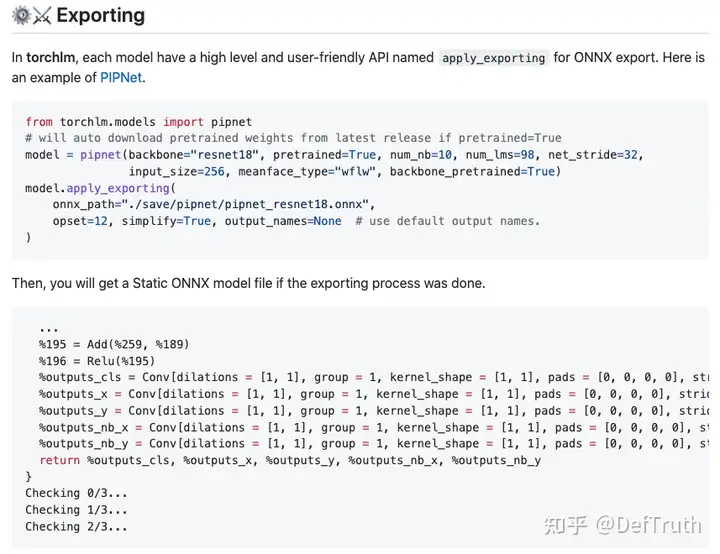
导出torchlm中的模型为ONNX进行部署:
torchlm的开源地址(欢迎star,提issue):
真溜了...只讲关键点这个系列,后面会陆续展开讲解一些关键点检测相关的论文,大家感兴趣的话可以先点赞关注一波。
更新:2022/06/03
---------------------------------------------分界线------------------------------------------
如何在lite.ai.toolkit(1.5k+ stars)中增加您的模型?
0. 近期一些感想
业余写了个C++ AI模型工具箱,叫lite.ai.toolkit;写这个repo的最开始的出发点,并不是有多远大的愿景或规划,只是为了更好地理解我所接触到的算法,更好地理解它们的细节。因为在我看来,有些东西,只有放在C++的层面来看,你才能真正接触到它最真实的细节。比如目标检测,后处理涉及anchor的生成和坐标反算,给定我一个20x20x?的输出,如果我能通过C++来准确地计算出anchor,并将预测的offsets在内存中索引位置和计算anchor索引对应上,准确无误地反算出最后的 bounding box,那么,我就认为自己算是理解了这段逻辑的细节了。所以我看一篇paper,了解一个新的算法,通常会非常倾向于用C++把它的推理过一遍,lite.ai.toolkit 就是一个我用来保存这些代码的地方。只是意料之外的是,后来捏的模型慢慢变多了,开始有一些些人关注,我也在想要不把这些代码都捏成一个库吧,所以就有了现在的 lite.ai.toolkit,目前为止收获了1.5k+ stars,但说实在的,个人真的是诚惶诚恐,因为我很清楚,这事情本身的难度并不大, lite.ai.toolkit 的代码质量也一般,只是我恰好这么做了。所以还是很感谢社区小伙伴们的支持~ lite.ai.toolkit 一直还没达到我心里面认可的1.0版本,比如说它至少要有100+模型,要对关键的前后处理有一些针对性的性能优化,要充分可拆解可二次开发(比如想要在mediapipe的基础上做二次开发,那可太难了),要有基本的不同平台的预编译库等等。不过,只要我还继续在做算法或工程,这个小工具应该就会继续维护下去,来日方长,咱们也且行且看 ~
1. 这篇文章讲什么
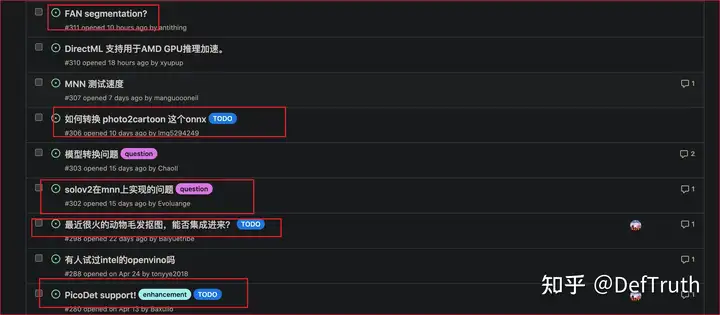
那么这篇文章讲些什么呢?有一些小伙伴在用 lite.ai.toolkit,最近慢慢地开始有越来越多的小伙伴提出一些issue说,想在lite.ai.toolkit中增加一些新模型,这其实就是如何对 lite.ai.toolkit 做二次开发的问题。最近的 issues 基本是长这样的。
但无奈的是,本人的业余时间实在是有限的,很难及时地去满足这些增加新模型的需求。这篇文章主要讲一下,如何把你自己的模型添加到lite.ai.toolkit。lite.ai.toolkit集成了一些比较新的基础模型,比如人脸检测、人脸识别、抠图、人脸属性分析、图像分类、人脸关键点识别、图像着色、目标检测等等,可以直接用到具体的场景中。但是,毕竟lite.ai.toolkit的模型还是有限的,具体的场景下,可能有你经过优化的模型,比如你自己训了一个目标检测器,可能效果更好。那么,如何把你的模型加入到lite.ai.toolkit中呢?这样既能用到lite.ai.toolkit一些已有的算法能力,也能兼容您的具体场景。我也在lite.ai.toolkit的repo中,同步开了一个issue,这个issue主要是讲这个问题。大家有疑惑的可以提在这个issue,我会尽可能回答~
2. Lite.Ai.ToolKit代码结构介绍
lite.ai.toolkit采用了尽可能解耦的方式来管理代码,基于不同的推理引擎的实现是相互独立的:
- 代码结构思路:ONNXRuntime版本的YOLOX和MNN版本的YOLOX是相互独立的,他们的代码分别管理在不同的目录下,你可以只编译ONNXRuntime版本的实现。
- 坏处和好处:虽然说这样做的坏处是难以避免出现重复的代码,但在AI原子能力层面做到了完全的独立,比如,如果你只想用onnxruntime版本的YOLOX,那么你完全可以把其他的模型cpp和h文件全部删掉,只保留yolox.cpp和yolox.h。另一个好处就是,可以在编译期决定你想要用什么模型,不想要用的模型完全不需要进行编译,这样编出来的库,其实也不会很大,这也是我后面准备添加的一个功能,这是后话,先不展开了。
回到二次开发这个话题,为方便lite.ai.toolkit的用户添加自己的模型,这里简单介绍下lite.ai.toolkit的代码布局。
- lite文件夹
该文件夹的根目录下包含了所有的主要代码,其结构如下:
--------------------------- 这部分是管理整理工程的代码 被下游的各个模块依赖 ----------------------------------
├── backend.h           宏处理 决定基础的推理引擎 目前必须是ONNXRuntime
├── config.h            宏处理
├── config.h.in         cmake编译时宏处理
├── lite.ai.defs.h      宏处理
├── lite.ai.headers.h   引入基础依赖库
├── lite.h              引入项目的基础对外的模块
├── pipeline            暂时没用
├── pipeline.h          暂时没用
├── types.h             基础类型,很重要,会被下游模块复用,比如实际上ort::types是types的alias
├── utils.cpp           基础功能函数实现,很重要,会被下游模块复用
└── utils.h             基础功能函数头文件
├── models.h            模型整体的命名空间管理,很重要,所有被实现的模型需要在这里被导出

 --------------------------- 以下的各个部分是相互独立的 但是需要依赖上面这个整体的部分 --------------------------
...
├── mnn
│   ├── core       MNN基础父类和特定功能的实现,必须要阅读
│   │   ├── mnn_config.h│   │   ├── mnn_core.h        MNN模型命名空间管理,实现一个类前,现在这里添加签名
│   │   ├── mnn_defs.h
│   │   ├── mnn_handler.cpp   基础父类实现,必须阅读
│   │   ├── mnn_handler.h
│   │   ├── mnn_types.h
│   │   ├── mnn_utils.cpp
│   │   └── mnn_utils.h
│   └── cv        各个模型的具体实现,会引用core中实现的父类和功能函数
│       ├── mnn_age_googlenet.cpp
│       ├── mnn_age_googlenet.h
│       ├── mnn_cava_combined_face.cpp
...
├── ncnn
│   ├── core       NCNN基础父类和特定功能的实现,必须要阅读
│   │   ├── ncnn_config.h
│   │   ├── ncnn_core.h         NCNN模型命名空间管理,实现一个类前,现在这里添加签名
│   │   ├── ncnn_custom.cpp
│   │   ├── ncnn_custom.h
│   │   ├── ncnn_defs.h
│   │   ├── ncnn_handler.cpp    基础父类实现,必须阅读
│   │   ├── ncnn_handler.h
│   │   ├── ncnn_types.h
│   │   ├── ncnn_utils.cpp
│   │   └── ncnn_utils.h
│   └── cv        各个模型的具体实现,会引用core中实现的父类和功能函数
│       ├── ncnn_age_googlenet.cpp
│       ├── ncnn_age_googlenet.h
│       ├── ncnn_cava_combined_face.cpp
│       ├── ncnn_cava_combined_face.h
│       ├── ncnn_cava_ghost_arcface.cpp
...
├── ort
│   ├── core       ONNXRuntime基础父类和特定功能的实现,必须要阅读
│   │   ├── ort_config.h
│   │   ├── ort_core.h         ONNXRuntime模型命名空间管理,实现一个类前,现在这里添加签名
│   │   ├── ort_defs.h
│   │   ├── ort_handler.cpp    基础父类实现,必须阅读
│   │   ├── ort_handler.h
│   │   ├── ort_types.h
│   │   ├── ort_utils.cpp
│   │   └── ort_utils.h
│   └── cv        各个模型的具体实现,会引用core中实现的父类和功能函数
│       ├── age_googlenet.cpp
│       ├── age_googlenet.h
│       ├── cava_combined_face.cpp
│       ├── cava_combined_face.h
│       ├── cava_ghost_arcface.cpp
│       ├── cava_ghost_arcface.h
...
├── tnn
│   ├── core       TNN基础父类和特定功能的实现,必须要阅读
│   │   ├── tnn_config.h
│   │   ├── tnn_core.h         TNN模型命名空间管理,实现一个类前,现在这里添加签名
│   │   ├── tnn_defs.h
│   │   ├── tnn_handler.cpp    基础父类实现,必须阅读
│   │   ├── tnn_handler.h
│   │   ├── tnn_types.h
│   │   ├── tnn_utils.cpp
│   │   └── tnn_utils.h
│   └── cv      各个模型的具体实现,会引用core中实现的父类和功能函数
│       ├── tnn_age_googlenet.cpp
│       ├── tnn_age_googlenet.h
│       ├── tnn_cava_combined_face.cpp
│       ├── tnn_cava_combined_face.h
│       ├── tnn_cava_ghost_arcface.cpp
│       ├── tnn_cava_ghost_arcface.h
│       ├── tnn_center_loss_face.cpp
3. 添加模型的步骤
以下以添加YOLOX的ONNXRuntime C++版本为例,讲解如何添加一个新模型。
- 第一步: 添加YOLOX类签名。在 lite/ort/core/ort_core.h 中添加YoloX签名,如果是其他推理引擎则还需要加具体的推理引擎作为前缀,如MNNYoloX.
// lite/ort/core/ort_core.h 中
namespace ortcv
{
  // ...
  class LITE_EXPORTS YoloX;                      // [56] * reference: https://github.com/Megvii-BaseDetection/YOLOX
}
// lite/mnn/core/mnn_core.h 中
namespace mnncv
{
// ...
class LITE_EXPORTS MNNYoloX;                      // [3] * reference: https://github.com/Megvii-BaseDetection/YOLOX
}- 第二步: 在 lite/ort/cv 中新建 yolox.h 和 yolox.cpp,注意最好文件名和你在xxx_core.h中的保持一致,方便管理,对于非ONNXRuntime的版本,还应该加上推理引擎作为前缀,如 mnn_yolox.h 和 mnn_yolox.cpp.
├── ort
│   ├── core       ONNXRuntime基础父类和特定功能的实现,必须要阅读
│   │   ├── ort_config.h
│...
│   │   └── ort_utils.h
│   └── cv        各个模型的具体实现,会引用core中实现的父类和功能函数
│       ├── yolox.cpp
│ ├── yolox.h- 第三步: 编写 YoloX 类的头文件,由于是静态维度推理,并且是单输入多(单)输出模型,所以可以继承 BasicOrtHandler(请自行阅读lite/ort/core/ort_handler.cpp具体实现),注意BasicOrtHandler有个transform的虚函数是要重写的。另外对于最终public的接口,也请保持detect的命名规范以确保API语义的统一性。请务必保持detect、detect_video等的命名规范,detect是图片级别的检测接口,detect_video是视频级别的检测接口。对于types命名空间,实际上对是全局types的引用,因此请在 lite/types.h中查看是否有合适的类型,如果没有则需要在 lite::types 命名空间中添加,然后再在 yolox.h 中使用,请尽可能保持自定义类型的简洁性。
ifndef LITE_AI_ORT_CV_YOLOX_H
define LITE_AI_ORT_CV_YOLOX_H

include "lite/ort/core/ort_core.h"

namespace ortcv
{
  class LITE_EXPORTS YoloX : public BasicOrtHandler
  {
  public:
    explicit YoloX(const std::string &_onnx_path, unsigned int _num_threads = 1) :
        BasicOrtHandler(_onnx_path, _num_threads)
    {};

    ~YoloX() override = default;

  private:
    // nested classes
    typedef struct GridAndStride
    {
      int grid0;
      int grid1;
      int stride;
    } YoloXAnchor;

    typedef struct
    {
      float r;
      int dw;
      int dh;
      int new_unpad_w;
      int new_unpad_h;
      bool flag;
    } YoloXScaleParams;

  private:
    const float mean_vals[3] = {255.f * 0.485f, 255.f * 0.456, 255.f * 0.406f};
    const float scale_vals[3] = {1 / (255.f * 0.229f), 1 / (255.f * 0.224f), 1 / (255.f * 0.225f)};

    const char *class_names[80] = {
        "person", "bicycle", "car", "motorcycle", "airplane", "bus", "train", "truck", "boat", "traffic light",
        "fire hydrant", "stop sign", "parking meter", "bench", "bird", "cat", "dog", "horse", "sheep", "cow",
        "elephant", "bear", "zebra", "giraffe", "backpack", "umbrella", "handbag", "tie", "suitcase", "frisbee",
        "skis", "snowboard", "sports ball", "kite", "baseball bat", "baseball glove", "skateboard", "surfboard",
        "tennis racket", "bottle", "wine glass", "cup", "fork", "knife", "spoon", "bowl", "banana", "apple",
        "sandwich", "orange", "broccoli", "carrot", "hot dog", "pizza", "donut", "cake", "chair", "couch",
        "potted plant", "bed", "dining table", "toilet", "tv", "laptop", "mouse", "remote", "keyboard",
        "cell phone", "microwave", "oven", "toaster", "sink", "refrigerator", "book", "clock", "vase",
        "scissors", "teddy bear", "hair drier", "toothbrush"
    };
    enum NMS
    {
      HARD = 0, BLEND = 1, OFFSET = 2
    };
    static constexpr const unsigned int max_nms = 30000;

  private:
    // 需要被重写的方法
    Ort::Value transform(const cv::Mat &mat_rs) override; // without resize

    void resize_unscale(const cv::Mat &mat,
                        cv::Mat &mat_rs,
                        int target_height,
                        int target_width,
                        YoloXScaleParams &scale_params);

    void generate_anchors(const int target_height,
                          const int target_width,
                          std::vector &strides,
                          std::vector &anchors);

    void generate_bboxes(const YoloXScaleParams &scale_params,
                         std::vector &bbox_collection,
                         std::vector &output_tensors,
                         float score_threshold, int img_height,
                         int img_width); // rescale & exclude

    void nms(std::vector &input, std::vector &output,
             float iou_threshold, unsigned int topk, unsigned int nms_type);

  public:
    // 请保持detect、detect_video等的命名规范,detect是图片级别的检测接口,detect_video是视频级别的检测接口
    void detect(const cv::Mat &mat, std::vector &detected_boxes,
                float score_threshold = 0.25f, float iou_threshold = 0.45f,
                unsigned int topk = 100, unsigned int nms_type = NMS::OFFSET);

  };
}
endif //LITE_AI_ORT_CV_YOLOX_H - 第四步: 在 yolox.cpp 中实现 YoloX 类的所有方法,并可能会引用全局的 lite/utils.h 进行复用,这基本是唯一的全局依赖了。
include "yolox.h"
include "lite/ort/core/ort_utils.h" // 引入onnxruntime特定的自定义功能函数,依赖于推理引擎
include "lite/utils.h" // 引入全局定义的功能函数,不依赖推理引擎,如NMS

using ortcv::YoloX;

Ort::Value YoloX::transform(const cv::Mat &mat_rs)
{
  cv::Mat canvas;
  cv::cvtColor(mat_rs, canvas, cv::COLOR_BGR2RGB);
  // resize without padding, (Done): add padding as the official Python implementation.
  // cv::resize(canva, canva, cv::Size(input_node_dims.at(3),
  //                                  input_node_dims.at(2)));
  // (1,3,640,640) 1xCXHXW
  ortcv::utils::transform::normalize_inplace(canvas, mean_vals, scale_vals); // float32
  // Note !!!: Comment out this line if you use the newest YOLOX model.
  // There is no normalization for the newest official C++ implementation
  // using ncnn. Reference:
  // [1] https://github.com/Megvii-BaseDetection/YOLOX/blob/main/demo/ncnn/cpp/yolox.cpp
  // ortcv::utils::transform::normalize_inplace(canva, mean_vals, scale_vals); // float32
  return ortcv::utils::transform::create_tensor(
      canvas, input_node_dims, memory_info_handler,
      input_values_handler, ortcv::utils::transform::CHW);
}

void YoloX::resize_unscale(const cv::Mat &mat, cv::Mat &mat_rs,
                           int target_height, int target_width,
                           YoloXScaleParams &scale_params)
{
  if (mat.empty()) return;
  int img_height = static_cast(mat.rows);
  int img_width = static_cast(mat.cols);

  mat_rs = cv::Mat(target_height, target_width, CV_8UC3,
                   cv::Scalar(114, 114, 114));
  // scale ratio (new / old) new_shape(h,w)
  float w_r = (float) target_width / (float) img_width;
  float h_r = (float) target_height / (float) img_height;
  float r = std::min(w_r, h_r);
  // compute padding
  int new_unpad_w = static_cast((float) img_width * r); // floor
  int new_unpad_h = static_cast((float) img_height * r); // floor
  int pad_w = target_width - new_unpad_w; // >=0
  int pad_h = target_height - new_unpad_h; // >=0

  int dw = pad_w / 2;
  int dh = pad_h / 2;

  // resize with unscaling
  cv::Mat new_unpad_mat = mat.clone();
  cv::resize(new_unpad_mat, new_unpad_mat, cv::Size(new_unpad_w, new_unpad_h));
  new_unpad_mat.copyTo(mat_rs(cv::Rect(dw, dh, new_unpad_w, new_unpad_h)));

  // record scale params.
  scale_params.r = r;
  scale_params.dw = dw;
  scale_params.dh = dh;
  scale_params.new_unpad_w = new_unpad_w;
  scale_params.new_unpad_h = new_unpad_h;
  scale_params.flag = true;
}

void YoloX::detect(const cv::Mat &mat, std::vector &detected_boxes,
                   float score_threshold, float iou_threshold,
                   unsigned int topk, unsigned int nms_type)
{
  if (mat.empty()) return;
  const int input_height = input_node_dims.at(2);
  const int input_width = input_node_dims.at(3);
  int img_height = static_cast(mat.rows);
  int img_width = static_cast(mat.cols);

  // resize & unscale
  cv::Mat mat_rs;
  YoloXScaleParams scale_params;
  this->resize_unscale(mat, mat_rs, input_height, input_width, scale_params);

  // 1. make input tensor
  Ort::Value input_tensor = this->transform(mat_rs);
  // 2. inference scores & boxes.
  auto output_tensors = ort_session->Run(
      Ort::RunOptions{nullptr}, input_node_names.data(),
      &input_tensor, 1, output_node_names.data(), num_outputs
  );
  // 3. rescale & exclude.
  std::vector bbox_collection;
  this->generate_bboxes(scale_params, bbox_collection, output_tensors, score_threshold, img_height, img_width);
  // 4. hard|blend|offset nms with topk.
  this->nms(bbox_collection, detected_boxes, iou_threshold, topk, nms_type);
}

void YoloX::generate_anchors(const int target_height,
                             const int target_width,
                             std::vector &strides,
                             std::vector &anchors)
{
  for (auto stride : strides)
  {
    int num_grid_w = target_width / stride;
    int num_grid_h = target_height / stride;
    for (int g1 = 0; g1 < num_grid_h; ++g1)
    {
      for (int g0 = 0; g0 < num_grid_w; ++g0)
      {
ifdef LITE_WIN32
        YoloXAnchor anchor;
        anchor.grid0 = g0;
        anchor.grid1 = g1;
        anchor.stride = stride;
        anchors.push_back(anchor);
else
        anchors.push_back((YoloXAnchor) {g0, g1, stride});
endif
      }
    }
  }
}

void YoloX::generate_bboxes(const YoloXScaleParams &scale_params,
                            std::vector &bbox_collection,
                            std::vector &output_tensors,
                            float score_threshold, int img_height,
                            int img_width)
{
  Ort::Value &pred = output_tensors.at(0); // (1,n,85=5+80=cxcy+cwch+obj_conf+cls_conf)
  auto pred_dims = output_node_dims.at(0); // (1,n,85)
  const unsigned int num_anchors = pred_dims.at(1); // n = ?
  const unsigned int num_classes = pred_dims.at(2) - 5;
  const float input_height = static_cast(input_node_dims.at(2)); // e.g 640
  const float input_width = static_cast(input_node_dims.at(3)); // e.g 640

  std::vector anchors;
  std::vector strides = {8, 16, 32}; // might have stride=64
  this->generate_anchors(input_height, input_width, strides, anchors);

  float r_ = scale_params.r;
  int dw_ = scale_params.dw;
  int dh_ = scale_params.dh;

  bbox_collection.clear();
  unsigned int count = 0;
  for (unsigned int i = 0; i < num_anchors; ++i)
  {
    float obj_conf = pred.At({0, i, 4});
    if (obj_conf < score_threshold) continue; // filter first.

    float cls_conf = pred.At({0, i, 5});
    unsigned int label = 0;
    for (unsigned int j = 0; j < num_classes; ++j)
    {
      float tmp_conf = pred.At({0, i, j + 5});
      if (tmp_conf > cls_conf)
      {
        cls_conf = tmp_conf;
        label = j;
      }
    } // argmax
    float conf = obj_conf * cls_conf; // cls_conf (0.,1.)
    if (conf < score_threshold) continue; // filter

    const int grid0 = anchors.at(i).grid0;
    const int grid1 = anchors.at(i).grid1;
    const int stride = anchors.at(i).stride;

    float dx = pred.At({0, i, 0});
    float dy = pred.At({0, i, 1});
    float dw = pred.At({0, i, 2});
    float dh = pred.At({0, i, 3});

    float cx = (dx + (float) grid0) * (float) stride;
    float cy = (dy + (float) grid1) * (float) stride;
    float w = std::exp(dw) * (float) stride;
    float h = std::exp(dh) * (float) stride;
    float x1 = ((cx - w / 2.f) - (float) dw_) / r_;
    float y1 = ((cy - h / 2.f) - (float) dh_) / r_;
    float x2 = ((cx + w / 2.f) - (float) dw_) / r_;
    float y2 = ((cy + h / 2.f) - (float) dh_) / r_;

    types::Boxf box;
    box.x1 = std::max(0.f, x1);
    box.y1 = std::max(0.f, y1);
    box.x2 = std::min(x2, (float) img_width - 1.0f);
    box.y2 = std::min(y2, (float) img_height - 1.0f);
    box.score = conf;
    box.label = label;
    box.label_text = class_names[label];
    box.flag = true;
    bbox_collection.push_back(box);

    count += 1; // limit boxes for nms.
    if (count > max_nms)
      break;
  }
if LITEORT_DEBUG
  std::cout << "detected num_anchors: " << num_anchors << "\n";
  std::cout << "generate_bboxes num: " << bbox_collection.size() << "\n";
endif
}

void YoloX::nms(std::vector &input, std::vector &output,
                float iou_threshold, unsigned int topk, unsigned int nms_type)
{
  if (nms_type == NMS::BLEND) lite::utils::blending_nms(input, output, iou_threshold, topk);
  else if (nms_type == NMS::OFFSET) lite::utils::offset_nms(input, output, iou_threshold, topk);
  else lite::utils::hard_nms(input, output, iou_threshold, topk);
} - 第五步: 在 lite/models.h 中添加类型别名,进行命名空间管理,其他的推理引擎版本的命名空间管理类似。(这个步骤后面会优化,比如会增加一些类似DECLARE_ORT_MODEL(...)的宏来方便用户使用,不过目前就先按照手动添加的方式来吧)
// ENABLE_ONNXRUNTIME
ifdef ENABLE_ONNXRUNTIME
// ...
include "lite/ort/cv/yolox.h"
endif

// 默认版本
namespace lite
{
  namespace cv
  {
ifdef BACKEND_ONNXRUNTIME
    typedef ortcv::YoloX _YoloX;
endif
  }
    // 2. general object detection
  namespace detection
  {
ifdef BACKEND_ONNXRUNTIME
    typedef _YoloX YoloX;
endif
  }
}
// 还有个onnxruntime的命名空间也要添加
namespace lite
{
  namespace onnxruntime
  {
    namespace cv
    {
      typedef ortcv::YoloX _ONNXYoloX;
    }
    // 2. general object detection
    namespace detection
    {
      typedef _ONNXYoloX YoloX;
    }
  }
}- 第六步: 编写测试工程 examples/lite/cv/test_lite_yolox.cpp
include "lite/lite.h"

static void test_default()
{
  std::string onnx_path = "../../../hub/onnx/cv/yolox_s.onnx";
  std::string test_img_path = "../../../examples/lite/resources/test_lite_yolox_1.jpg";
  std::string save_img_path = "../../../logs/test_lite_yolox_1.jpg";

  // 1. Test Default Engine ONNXRuntime
  lite::cv::detection::YoloX *yolox = new lite::cv::detection::YoloX(onnx_path); // default

  std::vector detected_boxes;
  cv::Mat img_bgr = cv::imread(test_img_path);
  yolox->detect(img_bgr, detected_boxes);

  lite::utils::draw_boxes_inplace(img_bgr, detected_boxes);

  cv::imwrite(save_img_path, img_bgr);

  std::cout << "Default Version Detected Boxes Num: " << detected_boxes.size() << std::endl;

  delete yolox;

}

static void test_onnxruntime()
{
ifdef ENABLE_ONNXRUNTIME
  std::string onnx_path = "../../../hub/onnx/cv/yolox_s.onnx";
  std::string test_img_path = "../../../examples/lite/resources/test_lite_yolox_2.jpg";
  std::string save_img_path = "../../../logs/test_lite_yolox_2.jpg";

  // 2. Test Specific Engine ONNXRuntime
  lite::onnxruntime::cv::detection::YoloX *yolox =
      new lite::onnxruntime::cv::detection::YoloX(onnx_path);

  std::vector detected_boxes;
  cv::Mat img_bgr = cv::imread(test_img_path);
  yolox->detect(img_bgr, detected_boxes);

  lite::utils::draw_boxes_inplace(img_bgr, detected_boxes);

  cv::imwrite(save_img_path, img_bgr);

  std::cout << "ONNXRuntime Version Detected Boxes Num: " << detected_boxes.size() << std::endl;

  delete yolox;
endif
}

static void test_mnn()
{
ifdef ENABLE_MNN
  // ...
endif
}

static void test_ncnn()
{
ifdef ENABLE_NCNN
  // ...
endif
}

static void test_tnn()
{
ifdef ENABLE_TNN
  // ...
endif
}

static void test_lite()
{
  test_default();
  test_onnxruntime();
  test_mnn();
  test_ncnn();
  test_tnn();
}

int main(__unused int argc, __unused char *argv[])
{
  test_lite();
  return 0;
} - 第七步: 在 examples/CMakeLists.txt中增加编译可执行文件的选项。
...
add_lite_executable(lite_yolox cv)
注意这步是需要一定的命名规范的,为了能够使用add_lite_executable函数,你必须把测试用例的cpp命名为以下格式:
test_lite_xxx.cpp 添加到CMakeLists时,使用add_lite_executable(lite_xxx, cv)- 第八步: 重新编译工程,并测试示例(Mac/Linux,Windows还需要手动拷贝编译好的lite.ai.toolkit.dll以及其他依赖库到 build/lite.ai.toolkit/bin)
sh ./build.sh && cd build/lite.ai.toolkit/bin && ./lite_yolox提示:对于多输入多输出模型,不能继承BasicOrtHandler,需要单独的实现,请参考 rvm.h 和 rvm.cpp 的做法。
4. 总结
OK,往 lite.ai.toolkit 工具箱中添加一个新模型的基本步骤就是这样。无论你是否熟悉推理部署,理解上面的步骤应该是不难的。按照上面的步骤,您就可以使用 lite.ai.toolkit 原有的一些能力,并在需要的时候,增加自己需要的新模型。 另外,我也在lite.ai.toolkit的repo中,同步开了一个issue,这个issue主要是讲这个问题。大家有疑惑的可以提在这个issue,我会尽可能回答~
还是那句话,受到一些关注,真是诚惶诚恐,这个小工具应该就会继续维护下去,对我来说也是个不错的学习的过程,所以来日方长,咱们也且行且看 ~ (预告:盲猜今年内能出个1.0版本~)
平时会写点破破烂烂的技术文章,感兴趣的可以关注我的技术专栏:
最近更新:FastDeploy来啦 ~
前言
大家好,我是DefTruth,一枚平平无奇的代码仔~ 所谓好记性不如烂笔头,写点技术水文,既是输出,也是一种输入。之前一直在写些和模型部署相关的水文,业余时间也会去维护一下自己的开源项目lite.ai.toolkit。不过最近有段时间没有更新文章了,这是为什么呢?哈哈哈,不卖关子,这是由于最近几个月,高密度地参与到了FastDeploy的开发当中。那么FastDeploy又是一个怎样的工具呢?他能帮助大家解决什么样的问题呢?接下来就和大家来分享一下这个部署利器。
这篇文章是【FastDeploy技术分享】专栏第一弹,后续还会和大家分享FastDeploy更多的使用技巧,欢迎关注 ~
正文内容
以下内容转载于微信公众号: 飞桨PaddlePaddle ,更多精彩内容,请关注 飞桨PaddlePaddle
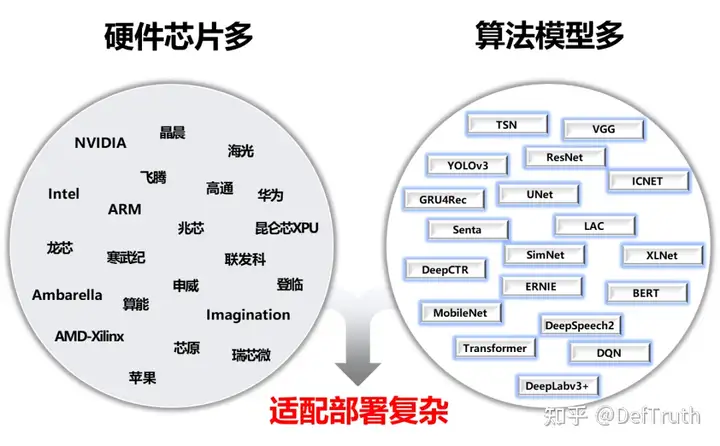
人工智能产业应用发展的越来越快,开发者需要面对的适配部署工作也越来越复杂。层出不穷的算法模型、各种架构的AI硬件、不同场景的部署需求(服务器、服务化、嵌入式、移动端等)、不同操作系统和开发语言,为AI开发者项目落地带来不小的挑战。
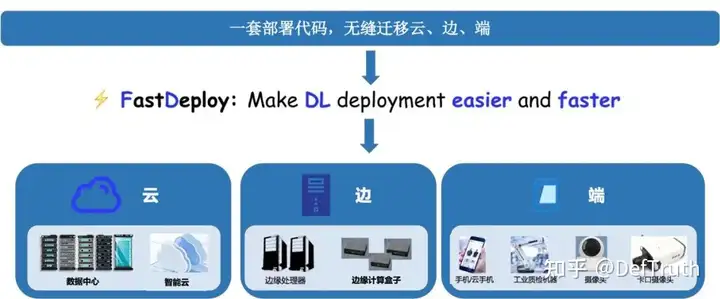
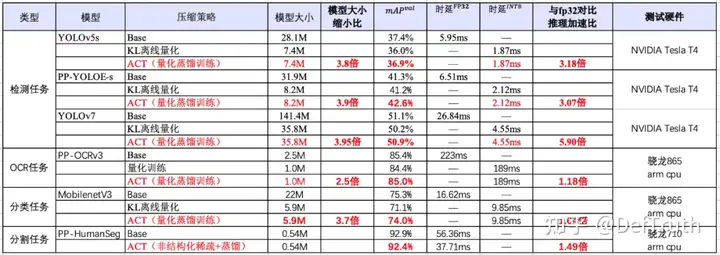
为了解决AI部署落地难题,我们发起了FastDeploy项目。FastDeploy针对产业落地场景中的重要AI模型,将模型API标准化,提供下载即可运行的Demo示例。相比传统推理引擎,做到端到端的推理性能优化。FastDeploy还支持在线(服务化部署)和离线部署形态,满足不同开发者的部署需求。 经过为期一年的高密度打磨,FastDeploy目前具备3类特色能力:
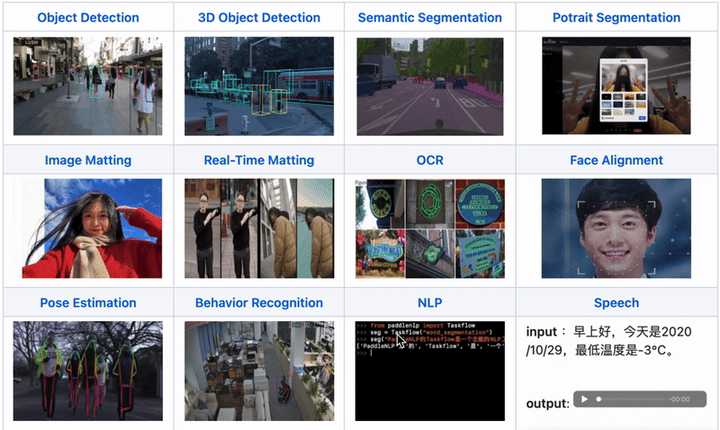
- 全场景:支持GPU、CPU、Jetson、ARM CPU、瑞芯微NPU、晶晨NPU、恩智浦NPU等多类硬件,支持本地部署、服务化部署、Web端部署、移动端部署等,支持CV、NLP、Speech三大领域,支持图像分类、图像分割、语义分割、物体检测、字符识别(OCR)、人脸检测识别、人像扣图、姿态估计、文本分类、信息抽取、行人跟踪、语音合成等16大主流算法场景。
- 易用灵活:3行代码完成AI模型的部署,1行代码快速切换后端推理引擎和部署硬件,统一API实现不同部署场景的零成本迁移。提供了150+热门AI模型的部署Demo。
- 极致高效:相比传统深度学习推理引擎只关注模型的推理时间,FastDeploy则关注模型任务的端到端部署性能。通过高性能前后处理、整合高性能推理引擎、一键自动压缩等技术,实现了AI模型推理部署的极致性能优化。项目传送门
以下将对该3大特性做进一步技术解读,全文大约2100字,预计阅读时长3分钟。
一. 3大特性篇二. 3步部署实战篇,抢先看
- CPU/GPU部署实战
- Jetson部署实战
- RK3588部署实战(RV1126、晶晨A311D等NPU类似)
3大特性解读
- 全场景:1套代码云边端多平台多硬件一网打尽,覆盖CV、NLP、Speech支持Paddle Inference、TensorRT、OpenVINO、ONNX Runtime、Paddle Lite、RKNN等后端,覆盖常见的NVIDIA GPU、x86 CPU 、ARM CPU(移动端、ARM开发板)、瑞芯微NPU(RK3588、RK3568、RV1126、RV1109、RK1808)、晶晨NPU(A311D、S905D)等云边端场景的多类几十款AI硬件部署。同时支持服务化部署、离线CPU/GPU部署、端侧和移动端部署方式。针对不同硬件,统一API保证1套代码在数据中心、边缘部署和端侧部署无缝切换。
FastDeploy支持CV、NLP、Speech三大AI领域,覆盖16大类算法(图像分类、图像分割、语义分割、物体检测、字符识别(OCR) 、人脸检测、人脸关键点检测、人脸识别、人像扣图、视频扣图、姿态估计、文本分类 信息抽取 文图生成、行人跟踪、语音合成)。支持飞桨PaddleClas、PaddleDetection、PaddleSeg、PaddleOCR、PaddleNLP、PaddleSpeech 6大热门AI套件的主流模型,同时也支持生态(如PyTorch、ONNX等)热门模型的部署。
- 易用灵活3行代码完成模型部署,1行命令切换推理后端和硬件,快速体验150+热门模型部署FastDeploy三行代码可完成AI模型在不同硬件上的部署,极大降低了AI模型部署难度和工作量。一行命令切换TensorRT、OpenVINO、Paddle Inference、Paddle Lite、ONNX Runtime、RKNN等不同推理后端和对应硬件。低门槛的推理引擎后端集成方案,平均一周即可完成任意硬件推理引擎的接入使用,解耦前后端架构设计,简单编译测试即可体验FastDeploy支持的AI模型。开发者可以根据模型API实现相应模型部署,也可以选择git clone一键获取150+热门AI模型的部署示例Demo,快速体验不同模型的推理部署。
- FastDeploy部署不同模型
PP-YOLOE的部署
import fastdeploy as fd
import cv2
model = fd.vision.detection.PPYOLOE("model.pdmodel",
                                    "model.pdiparams",
                                     "infer_cfg.yml")
im = cv2.imread("test.jpg")
result = model.predict(im) YOLOv7的部署
import fastdeploy as fd
import cv2
model = fd.vision.detection.YOLOv7("model.onnx")
im = cv2.imread("test.jpg")
result = model.predict(im)- FastDeploy切换后端和硬件
PP-YOLOE的部署
import fastdeploy as fd
import cv2
option = fd.RuntimeOption()
option.use_cpu()
option.use_openvino_backend()  一行命令切换使用 OpenVINO部署
model = fd.vision.detection.PPYOLOE("model.pdmodel",
                                    "model.pdiparams",
                                    "infer_cfg.yml",
                                    runtime_option=option)
im = cv2.imread("test.jpg")
result = model.predict(im)- 极致高效一键压缩提速,预处理加速,端到端性能优化,提升AI算法产业落地FastDeploy在吸收TensorRT、OpenVINO、Paddle Inference、Paddle Lite、ONNX Runtime、RKNN等高性能推理优势的同时,通过端到端的推理优化解决了传统推理引擎仅关心模型推理速度的问题,提升整体推理速度和性能。集成自动压缩工具,在参数量大大减小的同时(精度几乎无损),推理速度大幅提升。使用CUDA加速优化预处理和后处理模块,将YOLO系列的模型推理加速整体从41ms优化到25ms。端到端的优化策略,彻底解决AI部署落地中的性能难题。更多性能优化,欢迎关注GitHub了解详情
3步部署实战篇CPU/GPU部署实战(以YOLOv7为例)
- 安装FastDeploy部署包,下载部署示例(可选,也可3行API实现部署代码)
pip install fastdeploy-gpu-python -f https://www.paddlepaddle.org.cn/whl/fastdeploy.html
git clone https://github.com/PaddlePaddle/FastDeploy.git
cd examples/vision/detection/yolov7/python/- 准备模型文件和测试图片
wget https://bj.bcebos.com/paddlehub/fastdeploy/yolov7.onnx
wget https://gitee.com/paddlepaddle/PaddleDetection/raw/release/2.4/demo/000000014439.jpg- CPU/GPU推理模型
CPU推理
python infer.py --model yolov7.onnx --image 000000014439.jpg --device cpu
 GPU推理
python infer.py --model yolov7.onnx --image 000000014439.jpg --device gpu
 GPU上使用TensorRT推理
python infer.py --model yolov7.onnx --image 000000014439.jpg --device gpu --use_trt True- 推理结果示例
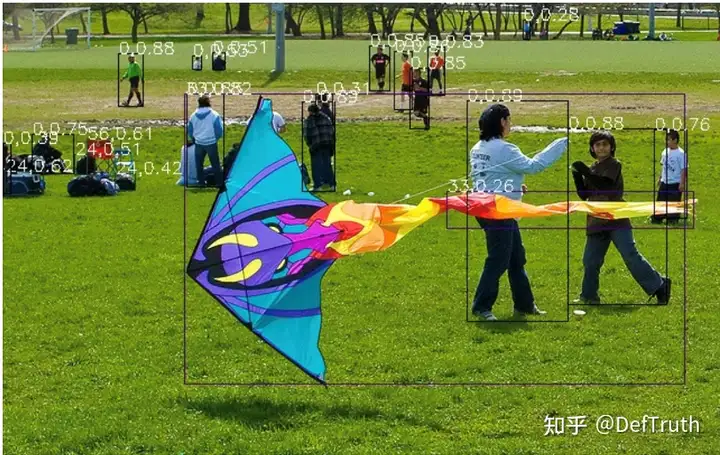
Jetson部署实战(以YOLOv7为例)
- 安装FastDeploy部署包,配置环境变量
git clone https://github.com/PaddlePaddle/FastDeploy cd FastDeploy
mkdir build && cd build
cmake .. DBUILD_ON_JETSON=ON DENABLE_VISION=ON DCMAKE_INSTALL_PREFIX=${PWD}/install make j8
make install
cd FastDeploy/build/install
source fastdeploy_init.sh- 准备模型文件和测试图片
wget https://bj.bcebos.com/paddlehub/fastdeploy/yolov7.onnx
wget https://gitee.com/paddlepaddle/PaddleDetection/raw/release/2.4/demo/000000014439.jpg- 编译推理模型
cd examples/vision/detection/yolov7/cpp
cmake .. DFASTDEPLOY_INSTALL_DIR=${FASTDEPOLY_DIR}
mkdir build && cd build
make j
使用TensorRT推理(当模型不支持TensorRT时会自动转成使用CPU推理)
./infer_demo yolov7s.onnx 000000014439.jpg 2- 推理结果示例

RK3588部署实战以轻量化检测网络PicoDet为例
- 安装FastDeploy部署包,下载部署示例(可选,也可3行API实现部署代码)
参考编译文档,完成FastDeploy编译安装
 参考文档链接:https://github.com/PaddlePaddle/FastDeploy/blob/develop/docs/cn/build_and_install/rknpu2.md
 下载部署示例代码
git clone https://github.com/PaddlePaddle/FastDeploy.git
cd examples/vision/detection/paddledetection/rknpu2/python- 准备模型文件和测试图片
wget https://bj.bcebos.com/fastdeploy/models/rknn2/picodet_s_416_coco_npu.zip
unzip -qo picodet_s_416_coco_npu.zip
 下载Paddle静态图模型并解压
wget https://bj.bcebos.com/fastdeploy/models/rknn2/picodet_s_416_coco_npu.zip
unzip -qo picodet_s_416_coco_npu.zip
 静态图转ONNX模型,注意,这里的save_file请和压缩包名对齐
paddle2onnx --model_dir picodet_s_416_coco_npu \
 --model_filename model.pdmodel \
 --params_filename model.pdiparams \
 --save_file picodet_s_416_coco_npu/picodet_s_416_coco_npu.onnx \
 --enable_dev_version True

python -m paddle2onnx.optimize --input_model picodet_s_416_coco_npu/picodet_s_416_coco_npu.onnx \
 --output_model picodet_s_416_coco_npu/picodet_s_416_coco_npu.onnx \
 --input_shape_dict "{image:[1,3,416,416]}"
 ONNX模型转RKNN模型
 转换模型,模型将生成在picodet_s_320_coco_lcnet_non_postprocess目录下
python tools/rknpu2/export.py --config_path tools/rknpu2/config/RK3588/picodet_s_416_coco_npu.yaml

 下载图片
wget https://gitee.com/paddlepaddle/PaddleDetection/raw/release/2.4/demo/000000014439.jpg- 推理模型
python3 infer.py --model_file ./picodet _3588/picodet_3588.rknn \
 --config_file ./picodet_3588/deploy.yaml \
--image images/000000014439.jpg- 加入FastDeploy技术交流群
- 入群福利FastDeploy: 除了本次更新外,硬件能力还在持续扩展中,包括Graphcore、飞腾、ARM CPU(安卓、iOS、ARMLinux)、高通、昇腾、地平线、昆仑、爱芯元智等;服务化部署、Jetson上基于硬解码的系统方案(即将发布)、端到端的高性能优化等。真正解决部署落地中大家关心的速度、性能、系统等问题。入群获取产品发新最新资讯。为了让开发者进一步了解FastDeploy的部署能力,更快速的使用到项目当中,
- GitHub传送门:
- 文章传送: