【一个本子】如何部署一个AI绘画服务器(Stable-diffusion—NovelAI)
目前大多数网上的文章都是基于一键安装包,如果想基于Github最原生的代码仓库部署,资料比较少。这里我们将采用原作者在GITHUB开源的代码,保证代码纯洁,并且具有更多可改造的能力。另外这篇文章是基于
目前大多数网上的文章都是基于一键安装包,如果想基于Github最原生的代码仓库部署,资料比较少。这里我们将采用原作者在GITHUB开源的代码,保证代码纯洁,并且具有更多可改造的能力。另外这篇文章是基于Linux的部署,因为咱们要做对外开放的服务器嘛,不过其实Linux如果你会部署了,Windows环境简直不要太轻松。
本篇文章主要是代码记录,不做代码命令解释和配置解读。如果你想知道大概的原理,部署的详细步骤和解释,以便自己更方便的DIV,可以看下参考这篇文章
【一个本子】详细-部署热门应用:Stable-Diffusion-Webui
开始
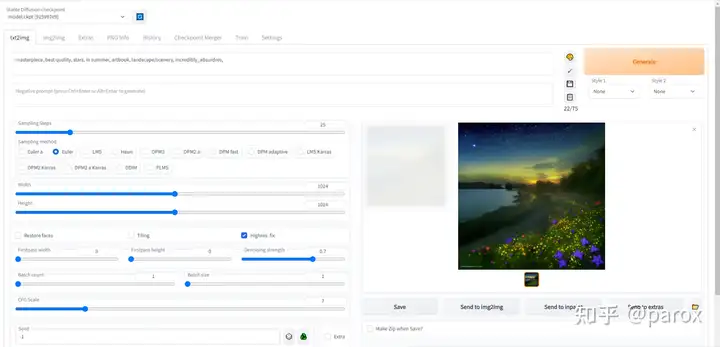
本篇文章记录了linux上,部署Stable-diffusion-webui所需的全部命令记录。你只要把这些命令依次输入你的linux服务器,就能得到一个对外开放的AI绘画服务器,界面大概如下(linux上部署不需要提前准备任何下载的东西哦,只需要通过命令就可以啦,除了模型需要根据自己需要找一下):

这个服务器支持你在任何地方通过IP访问。
以下是搭建这个服务器,linux上完整的命令记录
adduser stable
passwd stable
vim /etc/passwd
su stable
stable:x:1001:0::/home/stable:/bin/bash
yum -y install git
mkdir /home/stable
cd /home/stable
git clone https://github.com/AUTOMATIC1111/stable-diffusion-webui.git
wget https://www.openssl.org/source/openssl-1.1.1n.tar.gz --no-check-certificate
wget https://www.python.org/ftp/python/3.10.6/Python-3.10.6.tgz --no-check-certificate
tar -zxvf Python-3.10.6.tgz
tar -zxvf openssl-1.1.1n.tar.gz
cd openssl-1.1.1n
./config --prefix=/usr/local/openssl
make -j && make install
openssl version
mv /usr/bin/openssl /usr/bin/openssl.bak
ln -s /usr/local/openssl/bin/openssl /usr/bin/openssl
openssl version
cd /usr/local/Python-3.10.6/
./configure --prefix=/usr/local/python3 --with-openssl=/usr/local/openssl --with-openssl-rpath=auto
make && make install
/usr/local/python3/bin/python3.10 -V
/usr/local/python3/bin/python3.10 -m venv /home/stable/stable-diffusion-webui/venv
source /home/stable/stable-diffusion-webui/venv/bin/activate
cd /home/stable/stable-diffusion-webui
source webui.sh
pip install torch==1.12.1+cu113 torchvision==0.13.1+cu113 --extra-index-url https://download.pytorch.org/whl/cu113 --trusted-host download.pytorch.org
pip install -r requirements_versions.txt --prefer-binary -i https://pypi.douban.com/simple/
pip install git+https://gitee.com/hznn/GFPGAN.git@8d2447a2d918f8eba5a4a01463fd48e45126a379 --prefer-binary
pip install git+https://gitee.com/hznn/CLIP.git@d50d76daa670286dd6cacf3bcd80b5e4823fc8e1 --prefer-binary
pip install git+https://gitee.com/jerrylinkun/DeepDanbooru.git@d91a2963bf87c6a770d74894667e9ffa9f6de7ff --prefer-binary
pip install xformers==0.0.12 --prefer-binary -i https://pypi.douban.com/simple/
git clone https://github.com/CompVis/stable-diffusion.git ./repositories/stable-diffusion
git -C ./repositories/stable-diffusion checkout 69ae4b35e0a0f6ee1af8bb9a5d0016ccb27e36dc
git clone https://github.com/CompVis/taming-transformers.git ./repositories/taming-transformers
git -C ./repositories/taming-transformers checkout 24268930bf1dce879235a7fddd0b2355b84d7ea6
git clone https://github.com/crowsonkb/k-diffusion.git ./repositories/K-diffusion
git -C ./repositories/K-diffusion checkout f4e99857772fc3a126ba886aadf795a332774878
git clone https://github.com/sczhou/CodeFormer.git ./repositories/CodeFormer
git -C ./repositories/CodeFormer checkout c5b4593074ba6214284d6acd5f1719b6c5d739af
git clone https://github.com/salesforce/BLIP.git ./repositories/BLIP
git -C ./repositories/BLIP checkout 48211a1594f1321b00f14c9f7a5b4813144b2fb9
pip install -r /home/stable/stable-diffusion-webui/repositories/CodeFormer/requirements.txt -i https://pypi.tuna.tsinghua.edu.cn/simple
pip install opencv-python-headless -i https://pypi.douban.com/simple/
source webui.sh
python launch.py --listen --port 80
最后两行都是启动命令,第一次使用"source webui.sh"启动即可,后面的可以用"pythonlaunch.py--listen --port 80"启动,如果你想后台挂起,可以使用linux的nohup命令。
放两张自己生成的美图~


